Why hello there!!!!! I am writing this in the final days before my wedding but by the time you are reading these words, I will be a married woman and hopefully taking a nap! When Kali pitched this guest post, I thought it would be the perfect way to end this guest post series and lead-in to my own wedding skincare recap, which you’ll be getting next week (I think. Who knows what the future holds, I might need to nap more first?)
Guest writers–thank you for giving me the chance to take some time off and for being so generous with your own time and wisdom. Perhaps we can do this again sometime? If you missed any of the previous posts, do the smart thing:
And now, without further ado, it’s Kali time.
Hi friends! Hope this week finds you well and finds Jolie enjoying life as a newlywed! I’m Kali (she/her), a 30 year old living in Salt Lake City. I’ve spent the last 3 years finding what works for my skin and obsessively talking about products with whoever shares a similar interest with me. I work in orthopedics and when I am not at the hospital, I am usually cooking, reading, scrolling endlessly on my phone, hiking, mountain biking, or skiing.
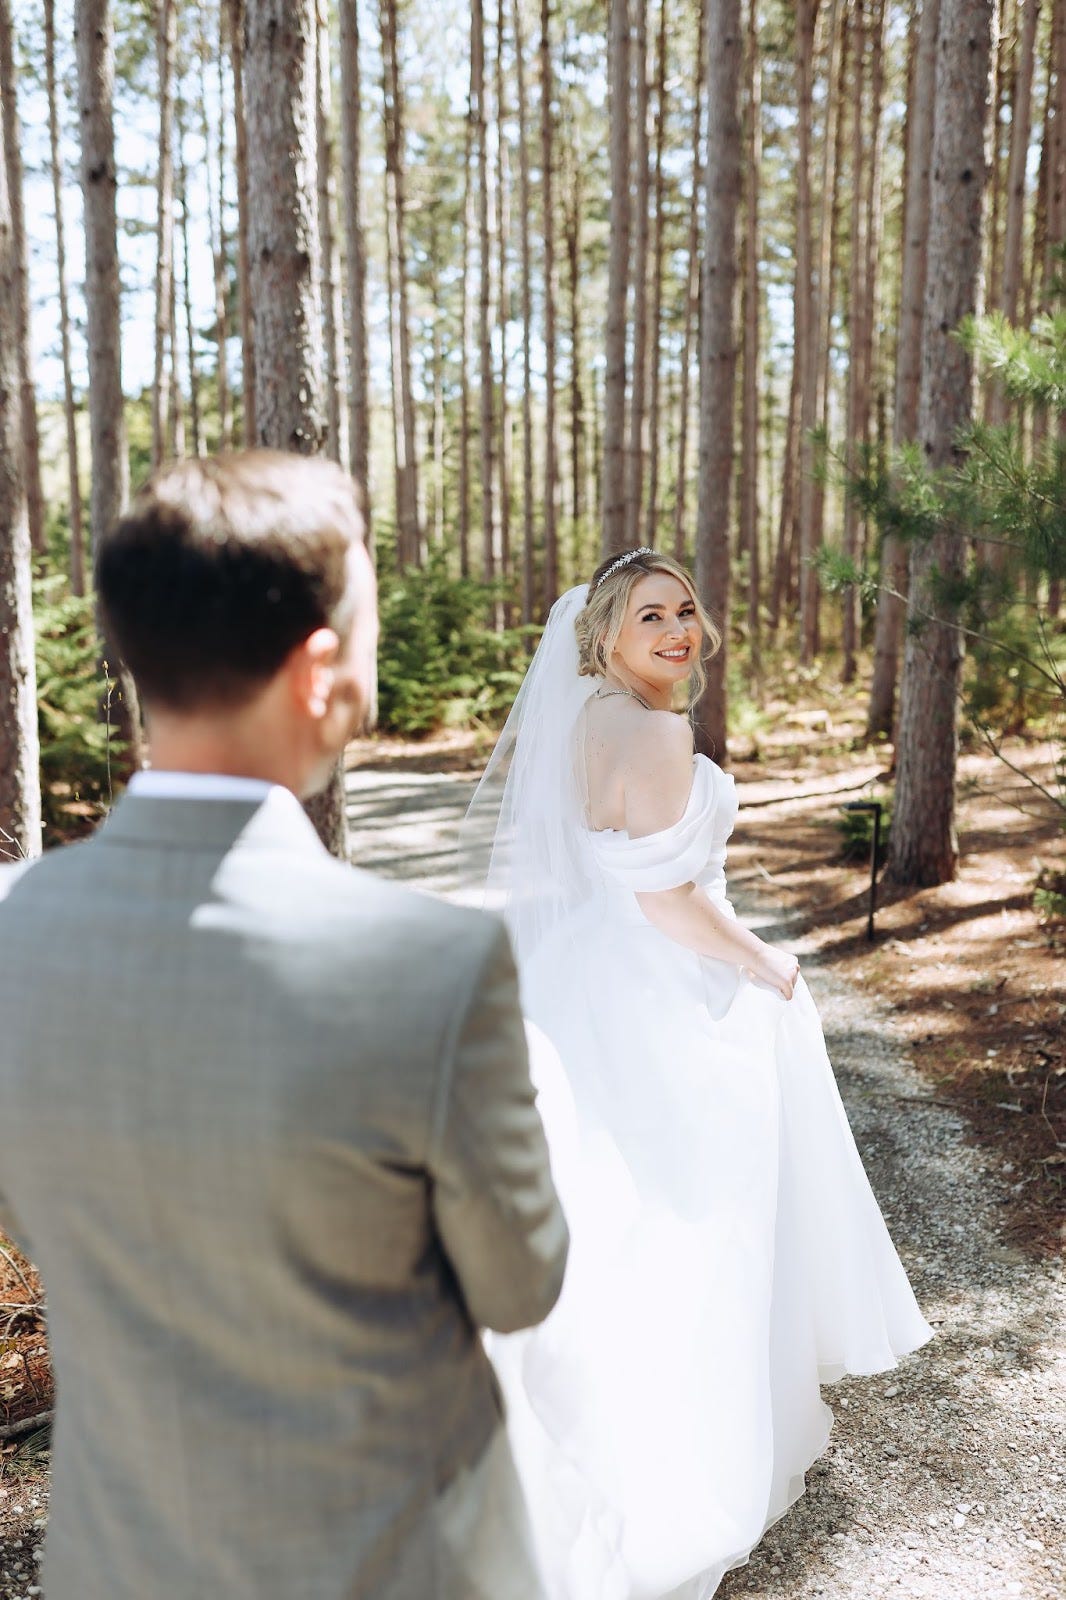
Like Jolie, I was a 2024 bride. My husband and I were married in May after a ~10 month engagement. Within days of our engagement, I was scouring the internet for “wedding prep skincare,” trying to find a plan that would lead me to my best skin for the big day. Google pulled up article after article written by dermatologists, estheticians, and beauty editors - all packed with great advice, yet I really wanted to see a real-life testimonial from a regular gal outside of the skincare industry who didn’t have access to every tool and treatment in the book.
I never found that article for myself, so instead I wrote it for you! I hope these steps make achieving your ideal wedding or special event skin seem accessible and attainable regardless of your skincare expertise and budget. I will start with a general 5-step guide and then separately fill you in on how this played out for me. Let’s get into it!
STEP 1: Identify your skincare goals and prioritize.
I cannot stress how important this step is! If you don’t know what result you are looking for, you will likely spend lots of hard earned cash on products and treatments that may or may not get the results you want.
Examples:
Clear up acne
Fade dark spots, sun damage, acne marks
Improve skin texture
Reduce redness
Have brighter skin tone
Minimize appearance of fine lines/wrinkles
When you have a list of goals, take some time to realistically evaluate whether trying to address everything seems reasonable or even possible with the time you have. Depending on the length of your engagement you may need to prioritize your top 2-3 goals. If you are struggling to narrow down your list or don’t know where to start, this would be the perfect time to book an appointment or virtual consultation with an esthetician. Many offer consults separate from services and don’t require long term commitments. Don’t be afraid to reassess your goals and change course down the road, but be wary of making any hard pivots in the 6-8 weeks right before the big day. Seriously, don’t even think about adding anything new right before the wedding, that’s the equivalent of impulsively cutting bangs on a bad day *shudders*.
STEP 2: Evaluate your current routine.
Do you have an established daily AM and PM skincare routine? If so, now is the time to evaluate your current products to see what goals you are targeting and what ones you may be overlooking. This is the fun part where you can find and try new products (one at a time!!!) to address your goals.
However, if you don’t already have a consistent base routine that includes cleanser, moisturizer and SPF, that’s where you need to start before rushing into a multi-step list of actives and treatments. An esthetician can be a great resource to help you build or edit a routine. Don’t be afraid to do your own research either - I’ve introduced my esthetician to new products! Use your phone, your skincare savvy friends, and professionals (Hi Jolie!) but remember YOUR routine needs to be suited for YOUR skin and YOUR goals, so it probably won’t be identical to your favorite blogger’s shelfie. Make sure to double check whether products will play well with each other if you aren’t consulting with an esthetician, and never forget your SPF!
Ideally, find products you love the experience of using, which will help with habit formation. Remember: you can buy all the products, use all the fancy tools and have all the treatments money can buy, but if there is no consistency in the way YOU treat your skin on a daily basis, you will either not see results or those you do see won’t last.
STEP 3: Explore at home treatment options.
We are in a time where more and more professional treatments are becoming available for personal purchase. Think red light masks, microcurrent devices, lasers, facial massagers, etc. In order to benefit from these products, you often have to be very consistent with use, and ones that have been scientifically reviewed often come with a hefty price tag.
Again, do your homework and know what the device(s) you are interested in targets and make sure it aligns with your previously established goals. Critically evaluate exactly how/when you will incorporate a home device into your routine prior to making a purchase, especially if the cost is a stretch for your budget. Having all the devices will do you no good if you don’t make the time to consistently use them (speaking from experience here).
STEP 4: Consider professional treatment options.
Here is where this process has the potential to become pricey and overwhelming.
My number one recommendation is to meet with an esthetician to discuss/vet your current routine and receive targeted product recommendations for your goals. This is where I started 2.5 years ago after wrecking my skin barrier in an attempt to DIY my routine. A consultation, whether in person or virtual, can help you with setting goals (Step 1), building an at home routine (Step 2), and determining what professional treatments are right for you. (See How to Find an Esthetician). A caveat here is depending on the business, an esthetician may or may not be able to discuss or recommend products outside of lines sold within their establishment.
If you have the interest and budget for injectables and other professional treatments, make a consultation appointment at a reputable location prior to making any commitments. There is often a deposit (i.e. $100) required to reserve an appointment, but often that payment will go towards the purchase of services. Hot tip: if you work in a hospital with a dermatology department, you may have employee discounts on cosmetic services.
At your consultation, go with your list of goals and be ready to ask questions as your provider makes recommendations.
Questions to consider:
When should I see results?
How long will results last?
How often will the service need to be repeated for desired effects?
When should I time treatments in relation to the wedding date and makeup trial?
It is important to have consultations/trials for any treatment, big or small, well in advance of your wedding for a multitude of reasons. You need time to see how your skin reacts/responds, make tweaks/adjustments if needed, and give plenty of time for injectables to wear off if you don’t like the results. Schedule final appointments well ahead of time as offices always book out farther than you think!!!
Remember professional treatment is OPTIONAL! You do not need to do anything to your skin at home or in an office to be beautiful on your wedding day! If you don’t have the budget for every treatment they recommend, or you change your mind, it is okay to say no to any or all of it. Also a friendly reminder you don’t have to justify your decision to anyone if you choose to have cosmetic treatments. If you want it, go for it!
STEP 5: Stick to your plan!!!
Once you have your at home routine, devices, and professional treatments scheduled, STICK TO IT!!
As they say, consistency is key! Avoid adding more products even though the urge will be strong - more is not always better. Absolutely DO NOT try anything new within 6 weeks of your wedding, or 3 months if you have excellent self control.
What This Looked Like In Practice:
To recap: at the time I was going through this process I was 29, working full time in a middle-class tax bracket, had no pets, no loans, and paid $900/mo in “rent” to my fiancé who managed to snag a condo 6 years ago at a stupidly low interest rate. There were significant contributions to our wedding made by both our parents, but we collectively shelled out some cash as well. All of this to say I had some discretionary funds to spend on skincare but I was by no means swimming in cash!
STEP 1: Goals & Prioritization
So you know what I’m working with, I have normal to dry skin (ahem, Utah), mild rosacea at the outer edge of my cheeks/jaw, large pores along my nose, and deep elevenses between my brows from two decades of squinting at books in the dark without my glasses on because with then I wouldn’t be able to lay my head on my pillow.
The four goals I prioritized:
Improve overall skin texture
Decrease facial redness
Smooth out forehead lines/wrinkles
Settle down mild hormonal acne around my chin
For me, skin texture was my main concern. I knew my makeup artist would be able to hide any redness with makeup, but I wanted a smooth canvas to make application easier when the big day came. As far as acne goes, mine has always been very mild (#blessed) and has improved with regular prescription Tretinoin usage. I know there are mixed feelings on diet/lifestyle factors for acne, but you can pry cheese, bread, dessert, and mezcal from my cold dead hands and I’ll leave it at that.
STEP 2: Current Routine
As a skincare aficionado prior to my engagement, I already had a comfortable routine prior to embarking on wedding skin prep. For me this looked like: splashing my face with water in the AM followed by Vitamin C, moisturizer, and SPF. In the evening I would double cleanse, use Rx tretinoin every few nights, and moisturize.
When evaluating my routine on my own and with my esthetician, there was plenty of room to add in a few targeted actives to address my goals. I wasn’t using any exfoliants and those would be a way to improve skin texture and hopefully reduce chin acne. I also began slugging every few nights during the winter months to see how my dry skin responded, and I definitely noticed improved moisture retention especially after cold days skiing.
STEP 3: Home Treatments
I’ve had a NuFace taking up space in my bathroom cabinet for years and even with a wedding looming, I could not bring myself to spend 5 minutes a day or every other day using it. To me, the process of washing my face only to need to rinse/wash the microcurrent gel off was more hassle than I was willing to commit to. Jolie did an excellent article on these devices back in July, see: Zipping & Zapping Our Way to a New Face.
After rave reviews with solid research, I did pull the trigger on a LED mask which could help address my concerns about forehead lines/wrinkles, facial redness and reducing acne. I used it regularly as directed for several weeks and then would forget about it for a month or so before picking it up again. I couldn’t quite figure out where it best fit in my daily routine - I sleep as late as possible in the AM before work so didn’t make time for 10 minutes of masking, and adding 10 minutes at night when my fiancé was already in bed didn’t work for me either. Did I notice improvements in my skin? Yes. Do I wish I would have been more consistent? Also yes. In hindsight have I gotten enough bang for my buck? I’m unsure; I could have spent that money on professional treatments/facials instead, but I will have the device forever and can pick it back up whenever.
STEP 4: Professional Treatments
Esthetician (Glow With Tara - Salt Lake City, UT):
Facials: I had one facial shortly after my engagement to discuss my current routine, product recommendations, and timing of services leading up to the wedding. My final facial was ~10 days prior to the wedding, including the trial of the CO2 Lift Mask.1 I used the morning of the wedding. 10 days before the wedding allowed my skin to settle after any extractions and gave me a bit of downtime prior to my pre-wedding dermaplane. Tara also walked my girlfriends and I through DIY facials at my bachelorette party, 10/10 would recommend.2
Dermaplaning: I’ve been burned one too many times by at home dermaplaning tools so I outsource this to the professionals for special occasions. Dermaplaning uses a scalpel to remove all the peach fuzz and top layer of dead skin cells, leaving your skin instantly smooth and glowy. It is an instant glow-up and the smooth skin makes a great canvas for makeup. Talk to your makeup artist (if using) about their preference for timing as some are particular (mine actually preferred 4+ days between dermaplaning and the wedding so there was a bit of fuzz for makeup to grip to). I booked dermaplane appointments prior to my makeup trial and again 1 week before the wedding.
University of Utah Cosmetic Dermatology:
Consultation: I paid $100 in advance for this appointment, with the knowledge that cost would get deducted from any treatments. I also receive a 10% discount as I work within the same hospital system.
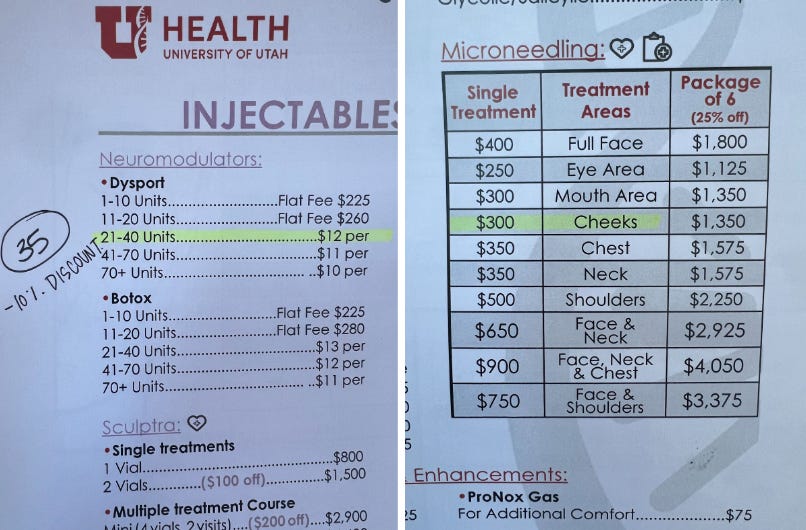
Dysport: My engagement period was the first time I used injectables. I chose Dysport as it is ~slightly~ cheaper than Botox. We focused on my forehead movement and my strong 11s between my eyes. Results for me lasted 3-4 months. My first injection was 7 months prior to the wedding, and then again 6 weeks prior to the big day. I spent about $350 each time for ~35 units, including the $100 initial consultation fee. I personally love how my face looked and felt. If money weren’t an issue I would absolutely go in for a 3rd round even though our wedding has passed, but we are buying a house and I want a puppy, so priorities…
Microneedling: At my consultation we discussed that several treatment sessions could help decrease the appearance of large pores around my nose/cheeks, but ultimately, I was seeing some results with an at home exfoliant and knew my makeup artist could use pore-minimizing or filling products so I decided to pass. Pricing was an added deterrent at $300 per treatment or $1350 for 6 treatments.
Laser: Various laser options could address facial redness, however the dermatologist said mine was mild and I may not notice significant improvement. Redness is also easily addressed with makeup application. Because we quickly ruled this out I didn’t come home with the pricing guide, but lasers are a heavy hitter on the wallet.
STEP 5: Consistency
I kept my upgraded routine (that included new exfoliants) the same throughout this process, with the late addition of an azelaic acid serum about 3 months prior to the wedding. It was a recommendation from Alyssa (@myglowtos on Instagram) that made a dramatic difference in my mild rosacea and skin texture at a very reasonable price point. Before purchasing I talked to Alyssa via DM and did my own research to confirm it worked with everything else in my routine and had a low chance to set my skin off. I am human and did struggle to resist adding in a spicy exfoliant mask I had picked up at the spring Sephora sale in the 4 weeks prior to the big day, but thankfully the desire to protect the skin I had worked hard for won out. I went into my wedding with what I can confidently say was my best skin ever,3 and did not break my budget or and I’ve continued the same routine even now.
Making Cents of It All
When working with Jolie to edit this post, she asked me if I had set a budget and what I was already spending on my skincare routine.4 Honestly, I didn’t give myself a set budget to work with and never put all of the wedding skincare spending in one place until now. I did my homework and listened to my gut (sometimes irresponsible) to decide what purchases felt right for me from a financial perspective. Ex: Spending $380 on botox to feel like a pretty pretty princess within 2 weeks passed the vibe check but $900-1350 on several microneedling sessions didn’t.
If I can save money on products I will. I have Dieux Instant Angel on subscription for the savings, I buy EltaMD in a 2 pack when it’s on sale at Dermstore and add on any of my dollars off rewards to keep bringing the price down. I bought Prequel products using the Shop app because I occasionally would have a few dollars lurking in there to use up (now I just go to Target!!!). I waited until the LED mask I wanted went on sale. You get the picture.
Okay, the numbers. TBH I’m glad I did the math seated even though I don’t regret any of the purchases I made. If numbers feel triggering to you, or you just want to live in ignorance for a bit longer feel free to scroll right on past this point.
Home Products: $744
Facials (3): $469
Dermaplaning (2): $251
Currentbody LED Mask: $304
Cosmetic Derm Consult & Botox (2 rounds of 35-40 units): $777
TOTAL: $2545
The home product portion of that is largely products that are a staple to my routine at baseline and is only inflated for wedding related spending with the purchase of the CO2Lift Mask ($97) I used in my hotel room the morning of my wedding. Without that item, the monthly cost of my routine is about $71 based on purchasing frequency. I can live with that!!!
If that breakdown is starting to make you spiral, please stop for a second and take a deep breath. Everything and I mean EVERYTHING I personally did beyond my core routine at home was completely optional! I could have spent $637 for the 9 months of my normal home products and that could have been all the skincare spending I did for wedding prep and that would have been just fine! And if that still seems pricey, remember my product choices are in what I would call the mid-tier spending range. I just built a quick Target routine of products I like (2 cleansers, vitamin c, exfoliant, moisturizer, SPF) and estimated a need to repurchase about every 3 months and the cost for 9 months would be $365. And if you are a cleanser and SPF only minimalist maybe you only spend $100 total!
All of this to say, you NEVER have to break the bank to have great skin on your wedding day! I hope you found my recommendations and experience helpful or at least insightful. Happy to gab about weddings and skincare in the comments or you can find me on Instagram at @kalinotthestate. I mostly post whatever books I’m reading or what I’m cooking, but I will happily connect with more internet skincare friends!
With love,
Kali
Kali’s Favorite Products
most of my favorites are linked in the post, but here’s a cheat sheet feat. a few other favorites
Jordan Samuel Skin Aftershow Treatment Cleanser
Slurp Laboratories Decalt
Sofie Pavitt Face Mandelic Clearing Serum
Prequel Lucent-C, Multi-Quench, Skin Utility Ointment and Gleanser
Niche Beauty Lab Azid (15% azelaic acid)
Dr. Idriss Major Fade Flash Mask
Dieux Instant Angel
iNNBeauty Project Extreme Cream and Mineral Sun Glow SPF
EltaMD UV Clear
The CO2 Lift Mask is that chicken-skin looking magical treatment mask that you may have seen me wearing on Instagram or at the bottom of this issue (where you can also find more info). I’d be hard pressed to find someone who isn’t a candidate for it–it’s remarkably reparative and regenerative, deeply hydrating and can even go right over broken skin. This mask was just one of the overlaps Kali and I had in our wedding skincare prep (you’ll hear more about mine soon), all of which were completely coincidental. She bought the mask from her own esthetician! And if you want, you can buy it from me by emailing hi@joldef.com
I squealed when I read this. What a delightfully fun idea!!! Should I do this? Would you want this? In-person? Virtually? Let me know!
And I can confidently say you looked phenomenal!!!!
I did ask her this because I thought it would be helpful framing for the regular gal real-life testimonial. But I was absolutely not expecting this level of transparency or reflection, though it is sincerely appreciated!!! I’m sorry if I caused you any shock Kali lol, you make exclusively good choices. I’m also sorry if I caused any shock to my fellow New Yorkers or anyone else wishing their Botox bill was under $1000.




Love love love! Thank you for the shoutout, Kali and for the feature, Jolie. You both are amazing!